Need help navigating Business Banking tools? Find helpful tips, step-by-step guides, and answers to common questions to help you manage your business account.
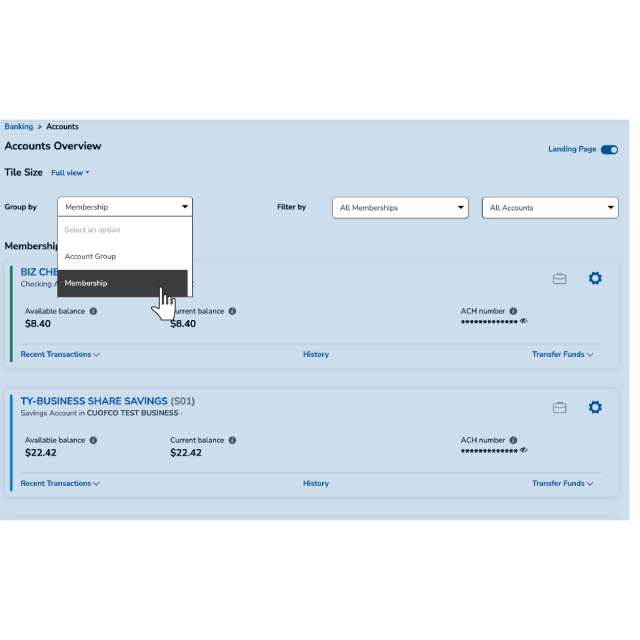
Sort Accounts by Membership or Type
Modify your view to see all accounts sorted by Membership or type of account. Begin by logging into digital banking or the mobile app.
In the mobile app, use the Group by and Filter by menus to change your view.
Select Group by account type to organize by type of account (checking accounts, savings accounts, etc.)
Select Group by membership to organize by membership number.
On desktop, use the Group by and Filter by menus to change your view.
Select Account Group to organize by type of account (checking accounts, savings accounts, etc.)
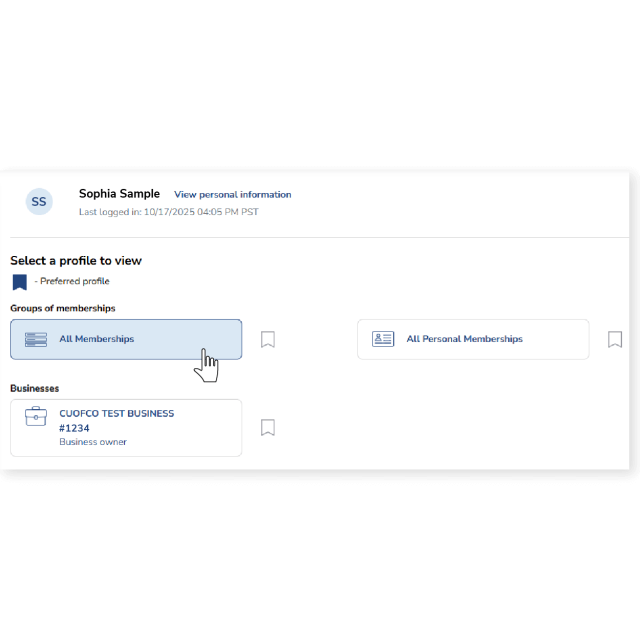
Profile Switcher
Switch between viewing your business and personal accounts using the Profile Switcher. Begin by logging into digital banking or the mobile app.
Access the menu to set your default view.
In the mobile app, select More (≡) and tap Switch profile at the top.
On desktop, select the profile icon in the upper right.
Choose the profile to view. The preferred profile is set to All Memberships by default, but you can use the preferred profile flag to change this to view All Personal Memberships, an individual Business Membership or All Businesses (if there are multiple).
After saving, your preferred profile will be the default view shown on your next login.
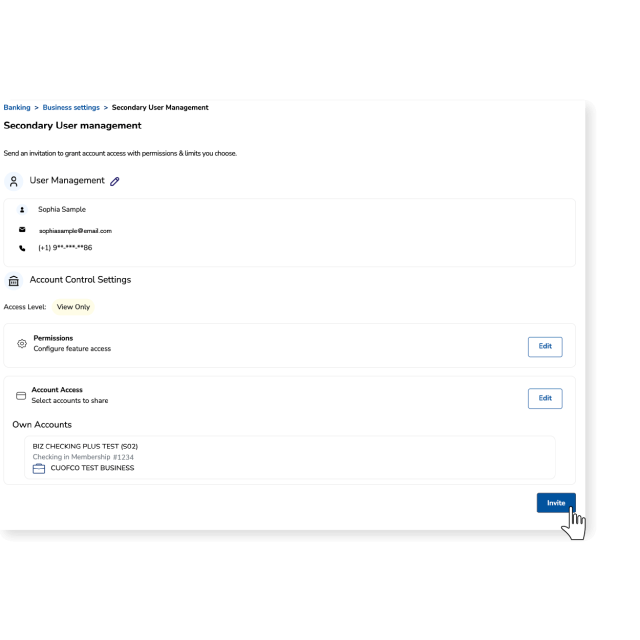
Secondary User Management
Give Digital Banking access to your authorized signers, bookkeepers, accountants, or anyone else who keeps your business running smoothly.
Any named owner on the business account can add secondary users. The person who adds a secondary user is responsible for managing their access, including setting transaction limits and approving any requests beyond those limits. To keep your account consistent, we recommend designating one person to create and manage all secondary users.
Please note that we're only able to assist named business owners with secondary user management. For security reasons, we're unable to make changes or provide direct support to secondary users.
If you have any other questions or need additional support regarding secondary user management, please visit our contact page.
The person who creates a secondary user is responsible for managing their access.
From the More menu, select Business Settings
Select Secondary User Management
Select + Add a new user
Review the Terms & Conditions, then check the I agree box and select Next to continue
Enter the First Name, Last Name, Email Address and Phone Number for the secondary user, then select Next to continue
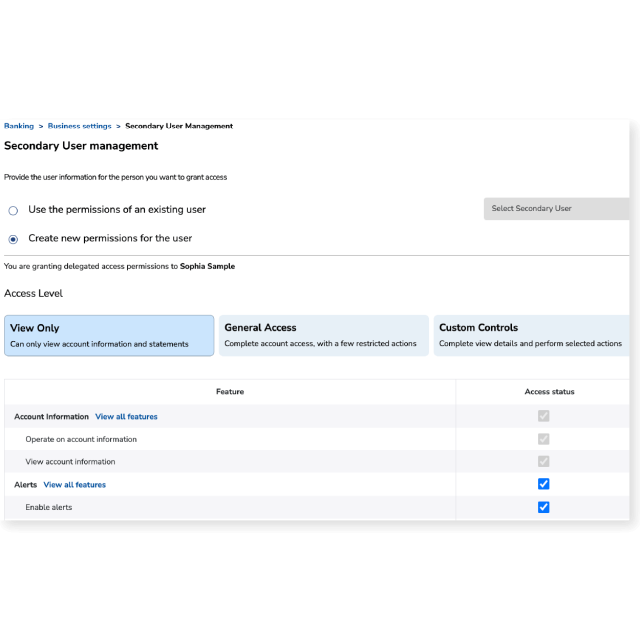
Select the type of account access for the user. Review the descriptions of the permissions. You can customize the user's permissions as needed. Then select Next to continue.
Select the accounts to share with the secondary user by checking the box next to the applicable account(s), then select Next to continue
The limits for the user will be set by default. Select Edit Limits, then click on the arrows to expand and review or change the limits as needed. Once limits are set, select Next to continue.
Review the secondary user’s settings. If the settings are accurate, select Invite to send an invitation to your new secondary user.
Change Secondary User Permissions
The person who creates a secondary user is responsible for managing their access, including changing their permissions.
From the More menu, select Business Settings
Select Secondary User Management
Select the secondary user you would like to update
Select the Edit button to edit Permissions or Account Access as needed. After permissions or account access settings are changed, select Update to continue.
Once permissions or account access are updated, you will return to the User Management screen. No additional action is needed. You can review the Permissions and Account Access details by selecting the Edit button if needed.
Deactivate a Secondary User Account
The person who creates a secondary user is responsible for managing their access, including deactivating their account.
From the More menu, select Business Settings
Select Secondary User Management
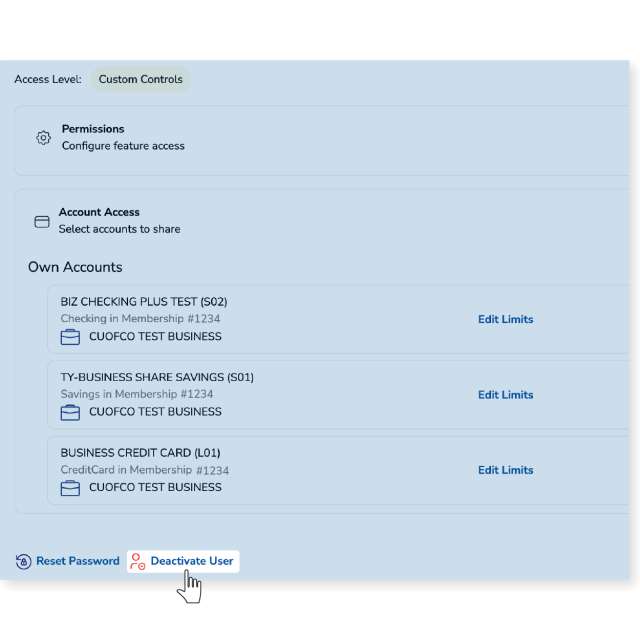
Select the secondary user you would like to deactivate
At the bottom of the User Management screen, select Deactivate User
The User Management screen will display confirmation that the secondary user has been deactivated
Return to Business Settings and select Secondary User Management. The deactivated user should no longer be shown on the Active users tab.
Review the deactivated user on the Deactivated users tab.
Reactivate a Secondary User Account
The person who creates a secondary user is responsible for managing their access, including reactivating their account.
From the More menu, select Business Settings
Select Secondary User Management
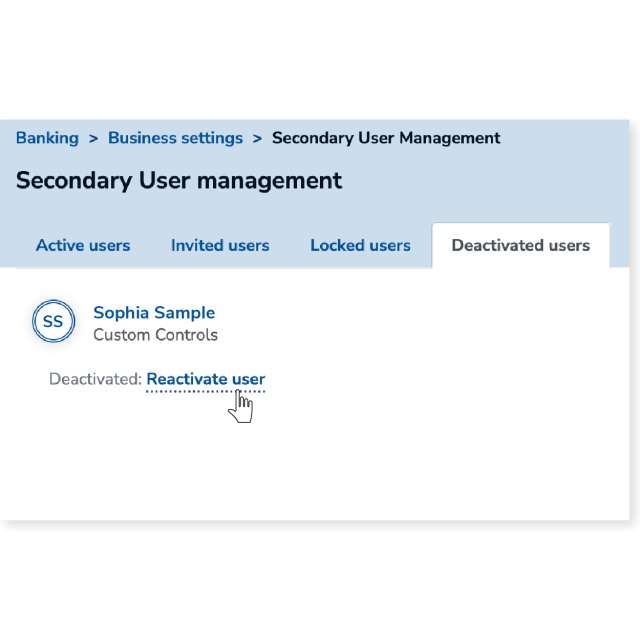
Select the Deactivated users tab
Select Reactivate user for the secondary user you would like to reactivate
Review the activated user on the Active users tab
As a best practice, we recommend resetting the password of any secondary users upon reactivation
Review Active Users
The person who creates a secondary user is the only one who will be able to review the user.
From the More menu, select Business Settings
Select Secondary User Management
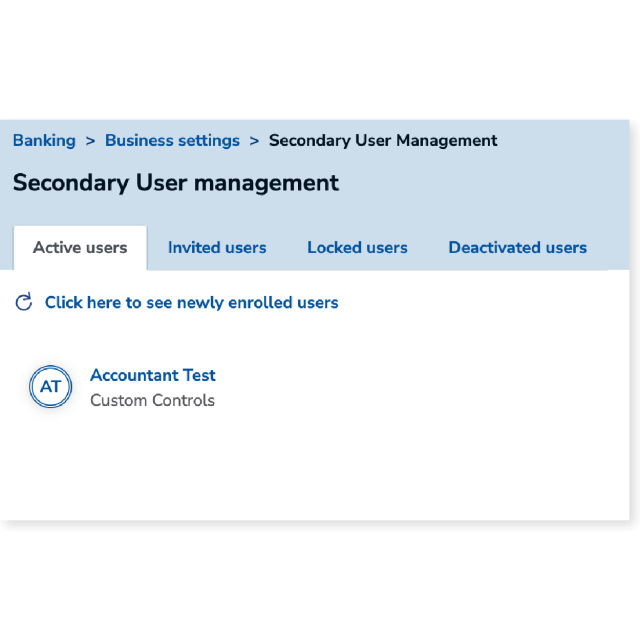
Active users will be displayed on the Active Users tab
Review Deactivated Users
The person who creates a secondary user is the only one who will be able to review the user.
From the More menu, select Business Settings
Select Secondary User Management
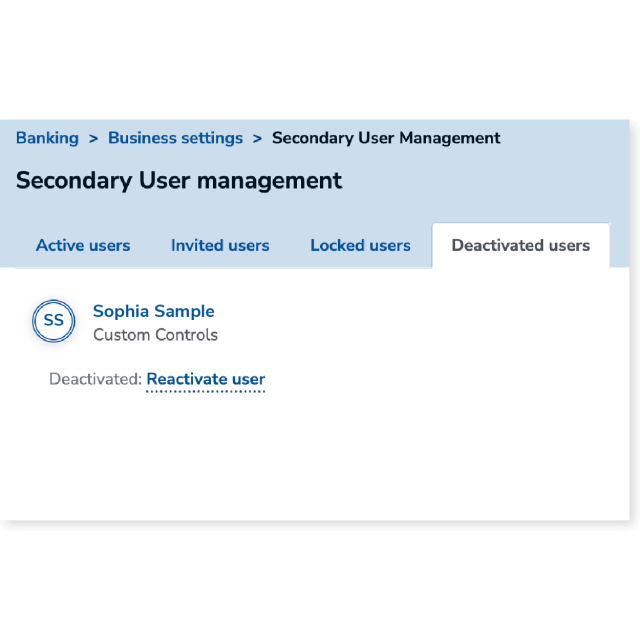
Deactivated users will be displayed on the Deactivated Users tab
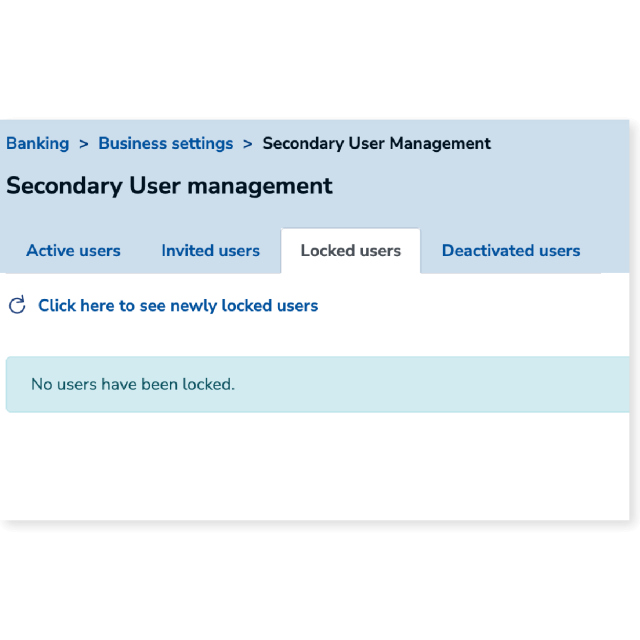
Unlock Secondary Users
The person who creates a secondary user is responsible for managing their access, including unlocking their Digital Banking account.
From the More menu, select Business Settings
Select Secondary User Management
Select the Locked users tab
For the locked user, select Unlock user to unlock their Digital Banking account
Notify the secondary user that their account has been unlocked
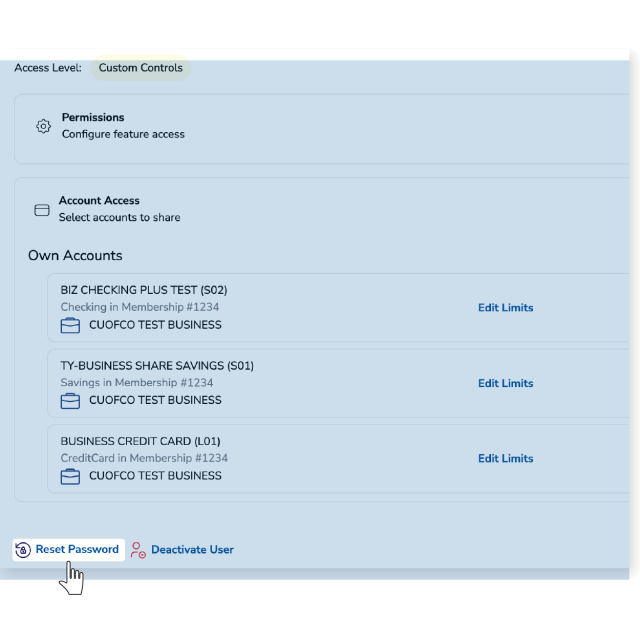
The person who creates a secondary user is responsible for managing their access, including resetting passwords. Password reset invitations do not expire.
From the More menu, select Business Settings
Select Secondary User Management
Select the secondary user you would like to manage
At the bottom of the User Management screen, select Reset Password
The secondary user will receive an email prompting them to reset their password
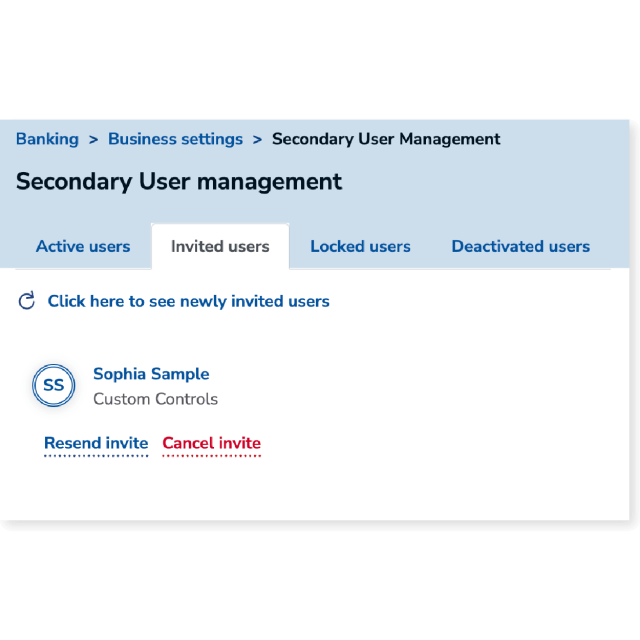
Review Invited Users
The person who invites a secondary user is the only one who will be able to review the invited user. Invitations to secondary users are available for 24 hours.
From the More menu, select Business Settings
Select Secondary User Management
Select the Invited Users tab
Invited users will be visible on the Invited Users tab
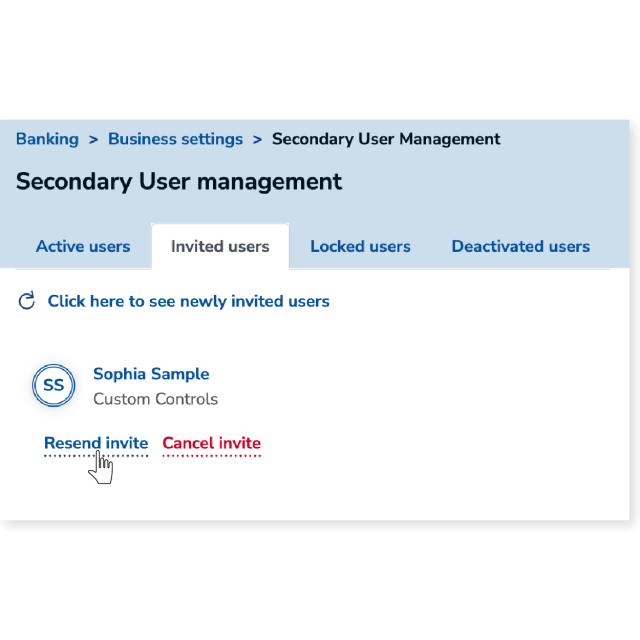
Resend an Invitation
The person who creates a secondary user is responsible for managing their access, including resending invitations. Invitations to secondary users are available for 24 hours.
From the More menu, select Business Settings
Select Secondary User Management
Select the Invited Users tab
For the invited user, select Resent invite to resend their invitation
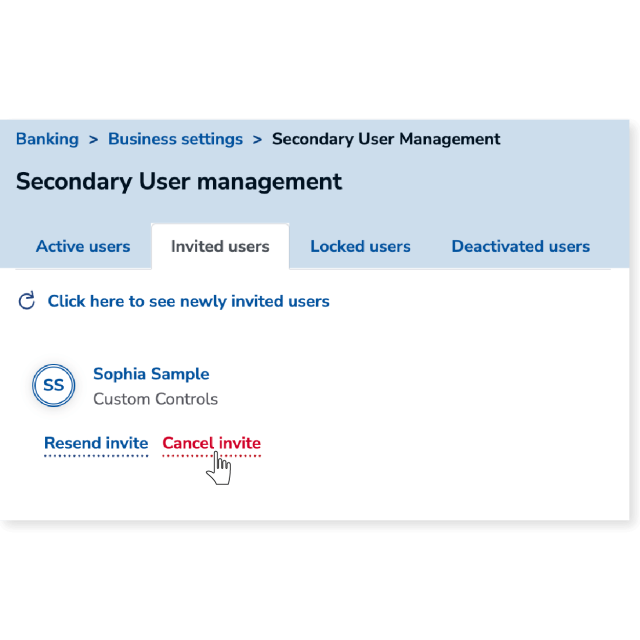
Cancel an Invitation
The person who creates a secondary user is responsible for managing their access, including canceling invitations.
From the More menu, select Business Settings
Select Secondary User Management
Select the Invited Users tab
Invited users will be visible on the Invited Users tab
For the invited user, select Cancel invite to cancel their invitation
Set Transaction Limits
Set and manage transaction limits for your secondary users across these types of activities:
Internal transfers within business accounts
Transfers to other CUofCO members (or other CUofCO business accounts)
External transfers (A2A)
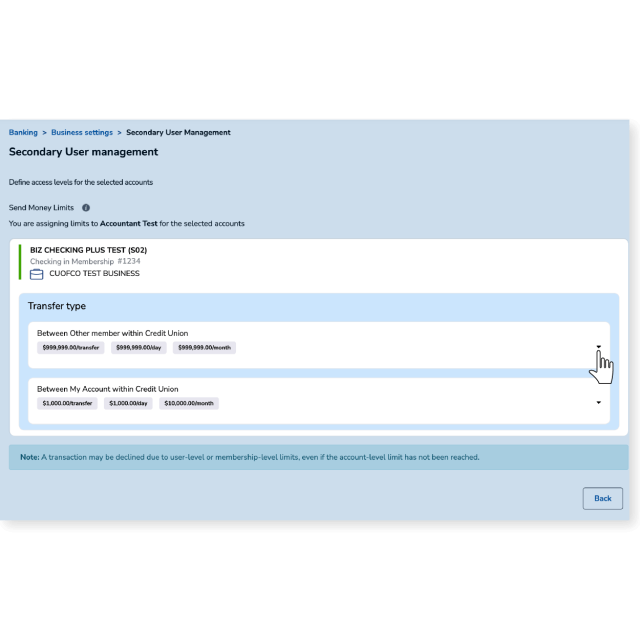
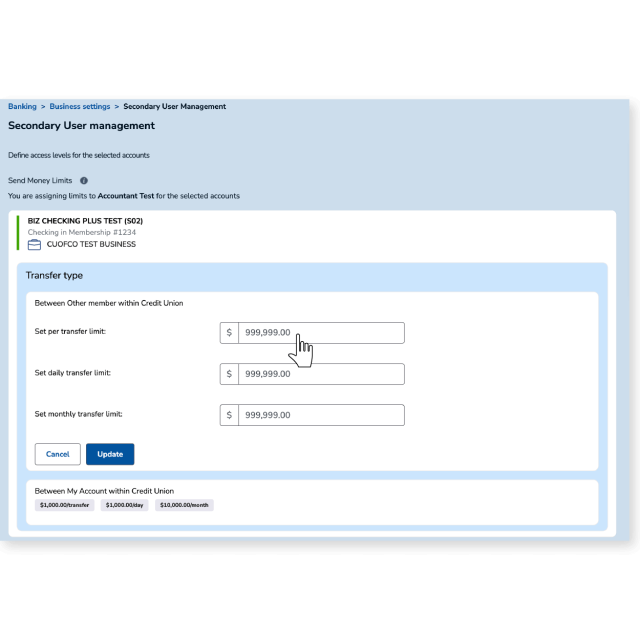
Edit Transaction Limits
When you add a secondary user, you can set their transaction limits. These limits can be updated anytime after the secondary user accepts their invitation. The person who creates the secondary user is responsible for managing their access, including adjusting limits as needed.
From the More menu, select Business Settings
Select Secondary User Management
Select the secondary user you would like to update
Select Edit Limits for the applicable account
Select the arrow to expand and review the current limits
Change the amount of the limit, then select Update to continue.
The screen will display confirmation that the account limit has updated successfully
Once permissions or account access are updated, you will return to the Send Money Limits screen. No additional action is needed. You can adjust additional limits on the same account for the same user as needed.
Select Back to return to the User Management screen. You can adjust limits for additional accounts by selecting Edit Limits as needed.
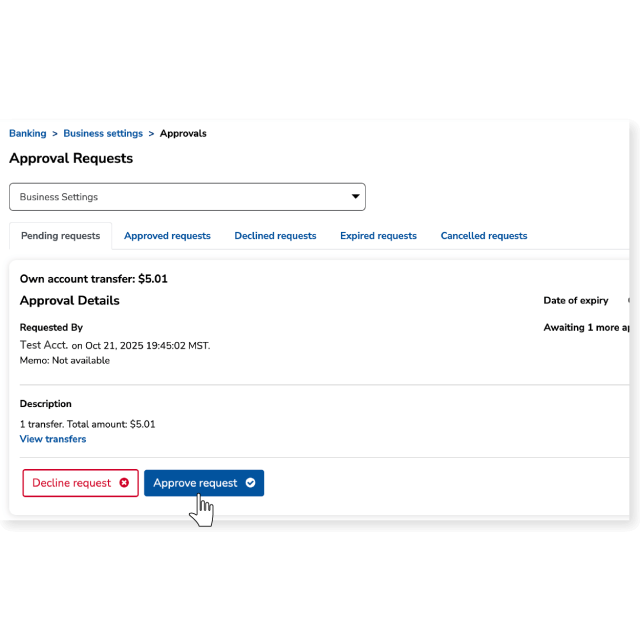
If a secondary user attempts a transaction that is over the limit set by the business owner, the transaction will be placed on hold until the owner approves it. The secondary user will be able to see the pending request under the Approval Requests menu in the Pending requests tab.
Review and Grant Approvals
When a secondary user attempts to make a transaction that exceeds their set limit, it will be placed on hold until the business owner approves it. The person who creates the secondary user is responsible for managing their access, including approving any transactions that may go over the limits.
The named business owner who created the secondary user will receive an email notification that a transaction approval is needed
Log in to digital banking or the mobile app
In mobile, select More, then select Business Settings and Approval Requests.
On desktop, select Requests from the upper right or select More, then select Business Settings and Approval Requests.
Select the arrow to expand the request and review request details
Select View transfers to review the source, recipient, and transaction description information
Select Decline request or Approve request. Note that requests cannot be edited. If any request details are incorrect, deny the request and ask the secondary user to initiate a new transaction.
Use the tabs in the approvals menu to review Approved requests, Declined requests, Expired requests, and Cancelled requests.
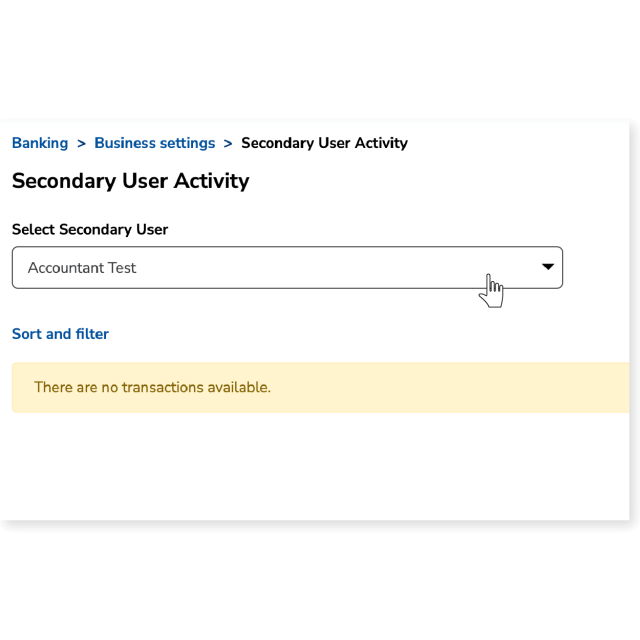
Review Secondary User Activity
Named business owners who create a secondary user can view all their transaction activity, including transfer and payment activity.
From the More menu, select Business Settings
Select Secondary User Activity
Select the secondary user from the dropdown
Review the transactions completed by the secondary user. You can use the expand, sort, and filter functions to adjust the viewable details as needed.
Effective November 18, 2025, all business account holders will be required to use their personal Digital Banking credentials to access associated accounts.
Our upgraded Biz Checking Plus Digital Banking experience includes access to a specialized platform with enhanced features, such as the ability to add secondary users like bookkeepers and accountants to your online banking.
Your account name may have changed from Business Checking to Biz Plus Checking when your account was upgraded. This change reflects enhanced features available to business members, including access to a specialized online banking platform.
Accounts with more than one associated individual are required to transition to the Biz Plus Checking account type. This account includes access to a specialized online banking platform designed specifically for business members, offering enhanced features such as secondary user management and role-based access.
We review the daily balance of all savings and checking accounts for the business across your business membership(s). If your daily aggregate balance falls below $5,000, a monthly fee will be applied to your Biz Checking Plus account at the end of the month.
While this account type does include a monthly fee, the fee is waived for current members as of November 18, 2025, for the first 12 months. You may notice the fee being charged and then refunded on your monthly statements during this promotional period.
For additional questions or to make changes to your business account, email us at bizbankingsupport@cuofco.org. A member of our Business Specialist team will be in touch within one business day.
If your secondary user has linked their existing login credentials to your business account(s), they can use the Profile Switcher to switch between their existing accounts and view the business.
If your business accounts are not showing, log out and log back in. Occasionally, it can take a moment for new accounts to sync, and signing out and back in helps complete that process.